English



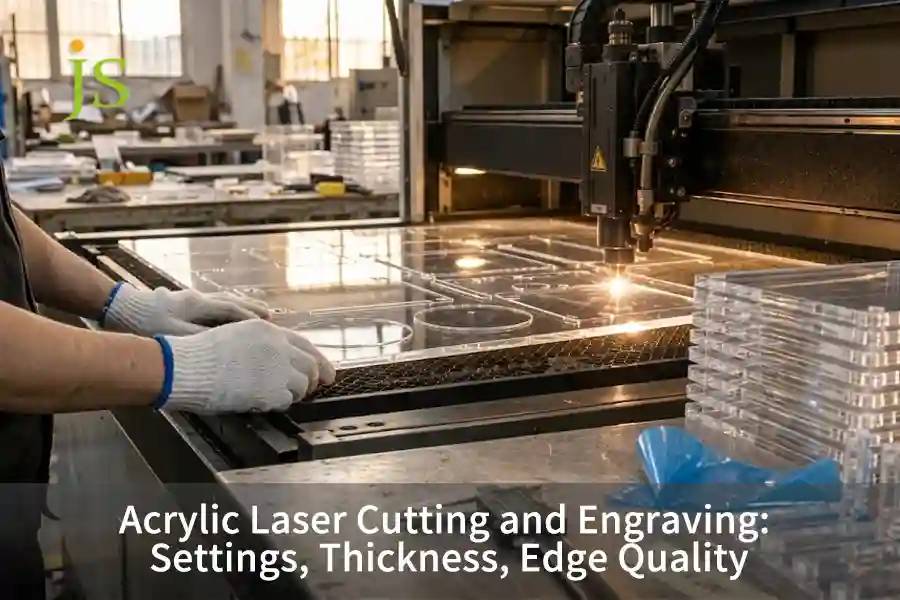

Acrylic laser cutting creates flame-polished edges and high-contrast engraving by vaporizing polymethyl methacrylate (PMMA) with a 10.6 m CO laser. Successful processing calls for choosing the correct resin grade, using low air assist pressure (0.2–0.5 bar), and applying dynamic focal sinking. Cast acrylic (GS) is recommended for frosted engraving, while extruded acrylic (XT) gives more uniform thickness.
This guideline sets performance standards for sheet thickness from 1 mm to 25 mm, with the purpose of avoiding edge crystallization, kerf tapering, and thermal crazing.
Process Parameter Baseline
Key Takeaway: CO₂ laser cutting of industrial acrylics works by decomposing the polymer. Cast acrylic yields high-contrast frosted white marks, while extruded acrylic sheets provide precise mechanical thickness tolerances (±5%).
|
Process |
Recommended Resin |
Core Parameters |
Edge & Finish Quality |
|
Profile Cutting |
Cast (GS) / Extruded (XT) |
10–12 W/mm, 5–20 kHz, 0.2–0.5 bar |
Flame-polished (Ra ≤0.8 μm), taper ≤1.5° |
|
Surface Engraving |
Cast Acrylic (GS) |
300–500 mm/s, 15%–30% power, 1.5–2.5 bar |
Crisp frosted white, zero debris |
Is Cast or Extruded Acrylic Better for Laser Cutting and Engraving?
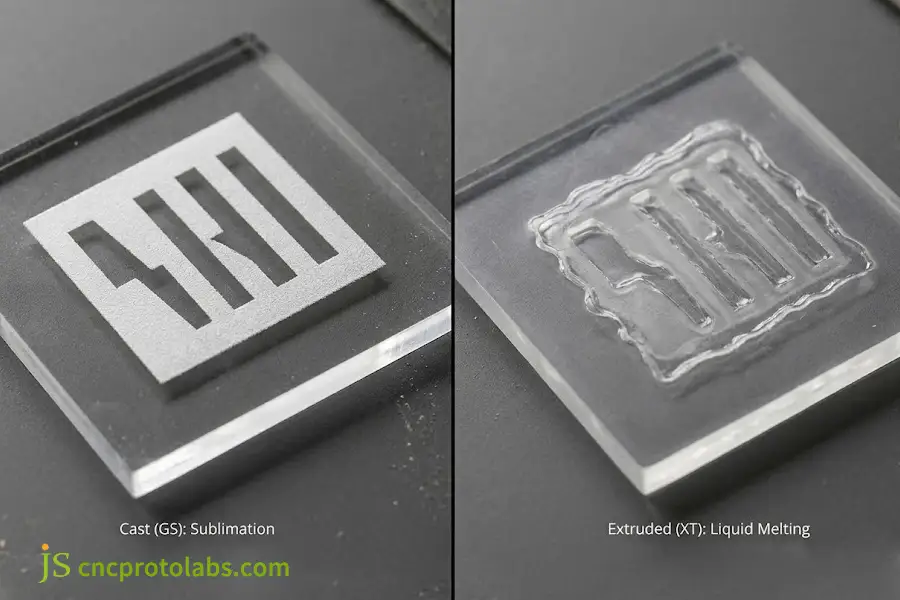
When evaluating cast vs extruded acrylic laser cutting, cast acrylic (GS) is more easily taken to be used for acrylic laser engraving because laser energy can depolymerize the high molecular weight cross-linked chains and give it a shiny, frosty white appearance. Whereas, extruded acrylic (XT) can be cut at relatively low laser power settings, with more precise thickness (tolerance ±5%) making it ideal for dimensional precision assemblies.
Material Chemistry and Thermal Breakdown
The manufacturing process directly controls how acrylic handles laser heat:
- Cast Acrylic (GS): Manufactured in batch processes with glass mold, molecular weight is close to 10⁶ g/mol. Laser beam causes the polymer to sublime to monomer vapors without going through a melting stage. Tg is 105°C and thermal unzipping occurs at temperatures from 160°C to 200°C without charring. Formed condensed particles create a bright frosted white trace with good contrast.
- Extruded Acrylic (XT): Manufactured in continuous processes with lower molecular weight, equal to 10⁵ g/mol. Plastic melts into liquid state prior to becoming vaporized. Edges become smooth and transparent when cut but engraving produces gummy shallow marks.
Criteria for Practical Selection of Materials
Match the material grade based on the functional requirements of the final component:
- For Engraving and Display Panels: Choose cast acrylic if the requirement is for White Lettering, Trophies or back lighting graphics.
- For Interlocking Sheet Enclosures: Choose extruded acrylic if there is an need for precise slot thickness within ±5%.
- Press Fit Components: Do not choose cast acrylic when the slot dimension is critical because it may vary up to ±15% per sheet.
- Applications subject to Chemical Exposure: Cast acrylic is preferred due to its crosslinked nature.
When planning assemblies with multiple thermoplastics, reviewing materials you can laser cut helps prevent thermal fit issues between different parts.
Select cast acrylic where there is a need for high contrast and white text, use extruded acrylic where cutting components that need to fit closely and repeatedly.
What Are the Recommended Acrylic Laser Cutting Settings and Thickness Limits?
Acrylic laser cutting typically needs a minimum power of 10 W for each 1 mm of material thickness when using a CO₂ laser source operating at 5,000–20,000 Hz. Standard industrial equipment can cut through acrylic up to 25 mm thick in a single pass. Achieving high optical edge quality calls for selecting an appropriate focal lens length (between 2.0" and 4.0") and positioning the beam focus point within the material.
Optical Absorption and Cutting Dynamics
In industrial applications, CO₂ lasers producing 10.6 μm wavelengths are used because acrylics absorb them at more than 92% efficiency. Diode lasers cannot cut transparent plastics due to the passage of visible light through the matrix without any heating effect. Fiber lasers working at 1.06 μm are unable to cut transparent PMMA too, and thus, CO₂ optics remain the benchmark for industries.
All profile cuts must be completed in a single pass. Passing through the same kerf more than once leads to three immediate failures:
- Excess heat causes the molten material to boil, leaving trapped air bubbles inside the edge.
- Discoloration of the surface occurs because of resin scorching and oxidation.
- Jagged horizontal stripes appear along the edges of the cut with a roughness of over 1.6 μm.
Material Thickness and Parameter Matrix
Engineers may refer to the acrylic laser cutting thickness chart below for baseline machine settings for different gauges:
|
Sheet Thickness (mm) |
Recommended CO₂ Power (W) |
Travel Speed (mm/s) |
Pulse Frequency (Hz) |
Lens Selection (Inches) |
Focal Point Offset (mm) |
|
1.0 – 3.0 mm |
30 – 50 W |
25 – 45 mm/s |
5,000 – 10,000 Hz |
2.0" Standard Lens |
Surface Focus (0.0 mm) |
|
4.0 – 6.0 mm |
60 – 80 W |
12 – 20 mm/s |
10,000 Hz |
2.0" or 2.5" Lens |
-1.0 mm (Sub-surface) |
|
8.0 – 10.0 mm |
100 – 130 W |
6 – 10 mm/s |
10,000 – 15,000 Hz |
2.5" High-Resolution |
-3.0 mm (1/3 material depth) |
|
12.0 – 15.0 mm |
150 – 180 W |
3 – 5 mm/s |
15,000 – 20,000 Hz |
3.0" Extended Waist |
-4.5 mm (1/3 material depth) |
|
20.0 – 25.0 mm |
250 – 350 W |
1.0 – 2.0 mm/s |
20,000 Hz |
4.0" Collimated Lens |
-10.0 mm (1/2 material depth) |
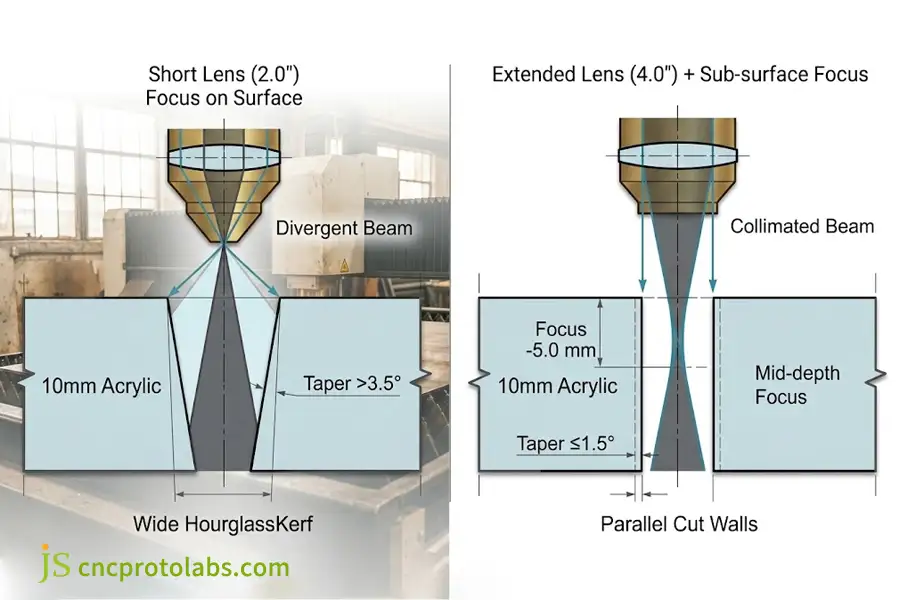
Key Takeaway: Minimum cutting speed decreases with increasing material thickness, and for heavy slabs additional focal length (up to 4. 0") and additional depth of sub-surface focal sinking (up to 1/2 the material thickness) are needed to compensate for the beam divergence and maintain the vertical edge taper below ±1.5°.
Controlling Kerf Taper on Thick Sheets
The laser beam is focused to a small spot that then diverges from the center. By focusing with a short 2.0" lens in thick acrylic material, a V-shaped kerf with greater than 3.5° taper will result. The hourglass shape of the beam causes wider kerf openings on the top side compared to the narrower exit on the bottom side.
To keep edges square and hold taper within ±1.5°:
- Switch to Longer Optics: Use a 2.5" to 4.0" lens on stock thicker than 8 mm to widen the effective depth of focus.
- Sink the Beam Focus: Locate the focus point 1/3 to 1/2 deep into the material instead of focusing it on the surface of the material.
- Balance Heat Input: Sinking the focus distributes power evenly between the top entry and bottom exit of the cut.
- Adjust Pulse Frequency: Set the frequency to 20,000 Hz when cutting thick slabs so that adjacent pulses overlap fully, which helps avoid scalloped edges.
All cutting machinery setups must comply with ISO 11553-1 Safety of Machinery for Laser Processing workplace guidelines.
To cut thicker sheets, use a longer lens and sink the focus inside your material so that the edges stay perpendicular.
How to Optimize Acrylic Laser Cutting Edge Quality and Prevent Thermal Crazing?
The air assist pressure and thermal cooling rate determine the optimization of acrylic laser cutting edge quality. High air pressure rapidly chills the molten PMMA during laser cutting, resulting in white frosty striae and micro-cracking, where as mild air assist (0. 2-0. 5 bar) permits vaporized edges to self-heal and achieve a flame-polished surface. Residual thermal stresses require escape via annealing at 80°C before crazing of solvent swollen edges can occur.
Air Assist Tuning for Clear Edges
When the air is compressed to high pressure, the cutting quality deteriorates. The increased air flow freezes the heated boundary layer rapidly and causes ripples in it, making the edge whitish and frosty. In the process of acrylic laser processing, we don't need the chip clearing, but rather vapor removal without disturbing the heated boundary layer.
Bringing the air pressure to between 0.02 and 0.05 MPa (0.2–0.5 bar) solves this problem. The light stream will blow these flammable gases away without scouring the hot acrylic edge so it has a long surface 'fluid time' to self-level by surface tension to a clear, flame-polished gloss with surface roughness Ra 0. 8 μm. Clean pure nitrogen no oxygen for oxidation reduces yellowing of optical grade prisms.
Thermal Stress and Solvent Crazing
The process of laser cutting results in extreme thermal gradients of over 300°C/mm. With the rapid cooling of the cut edge, it contracts much more quickly compared to the hot inner material core, thus retaining between 20 to 35 MPa of tensile stress.
If bonded or alcohol is in contact with a unannealed edge, the plastic will immediately shatter into spiderweb cracks. This break is known as solvent crazing. The solvent molecules are able to diffuse in the micro-voids of the stressed polymer chains, reducing the energy required for the crack to grow.
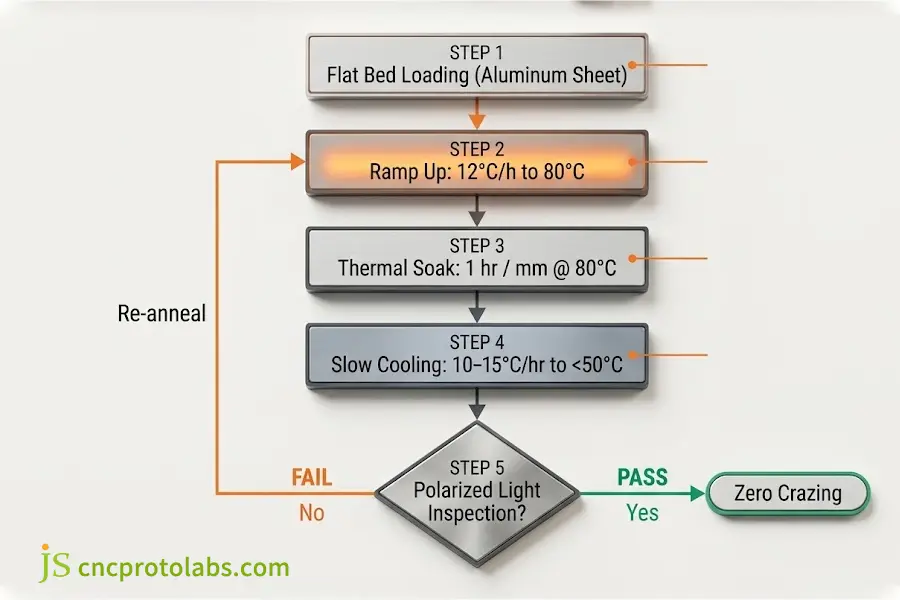
Prevent crazing of parts by putting them through an annealing process in a circulating air oven:
- Oven Loading: Place the parts in flat position on aluminum sheets.
- Controlled Heating: Heat the oven up to 80°C with a heating rate of 12°C/hour.
- Thermal Soak: 80°C for 1 hour per millimeter of section thickness (e. g. 6 hours for 6mm plate).
- Slow Cool-Down: Reduce the temperature at a rate of 10–15°C /hr. Until the temperature drops below 50°C.
- Stress Inspection: Check residual stress relief through cross-polarized filters to make sure rainbow birefringence fringes have disappeared completely.
For complex parts with deep blind pockets or sensitive assembly points, acrylic CNC machining offers a cold-cutting alternative that bypasses thermal stress entirely.
Ensure air assist is as low as possible for crystal-clear edges. Bake it at 80°C if the part will be glued or cleaned with alcohol (inhibits formation of fine stress cracks).
What Technical Controls Ensure High Precision in Acrylic Laser Cutting for Industrial Applications?
In JS Precision's manufacturing processes, using an active honeycomb bed support and vacuum exhaust filtration as well as the correct acrylic laser engraving settings keep dimensional accuracy and surface quality to within ±0.1mm.
Kerf Compensation for Precision Fit
The laser removes a small channel of material called kerf, which spans between 0.20 mm and 0.40 mm wide on acrylic. Cutting along drawing lines without adjustment leaves parts undersized. Internal cutouts such as display viewing holes will end up oversized, while external outer dimensions will finish undersized.
Holding tight ±0.1 mm tolerances requires two adjustments:
- Measure actual kerf width on sample cuts for the specific sheet batch.
- Apply an outer contour offset in CAM software equal to half the measured kerf (0.10–0.20 mm).
- Reverse offset rules for internal holes by offsetting vector paths inward to preserve hole diameters.
Preventing Backside Flashback Scars
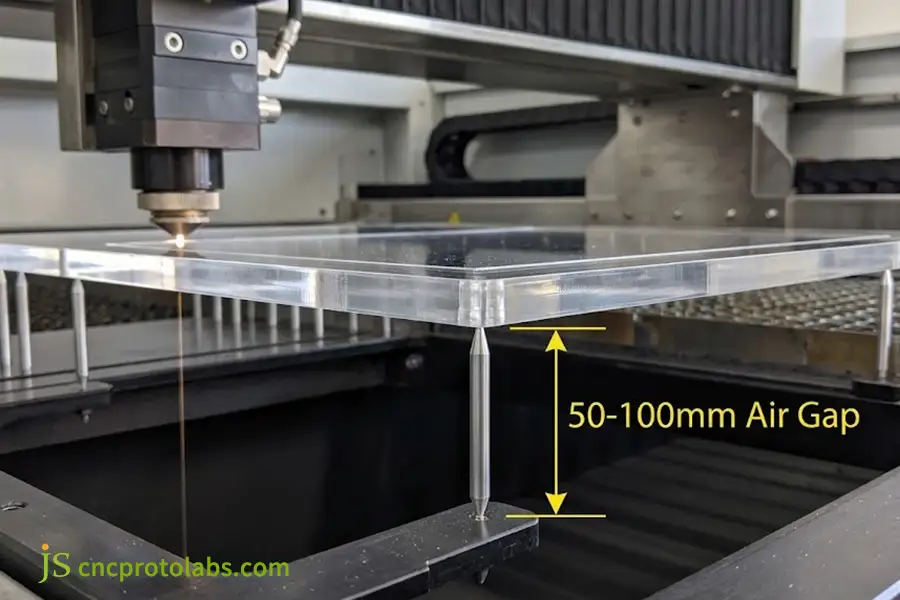
The reflections occur when cutting acrylic with a flat metal table since the beam will cause energy to reflect from the metal table and burn the back side of the transparent sheet. This problem leads to milky pitting of the back side of the optical display window.
To keep both surfaces clean:
- Rest the sheet on narrow anodized aluminum pins or knife-edge slats.
- Raise the sheet up to 50-100 mm above the collection floor.
- Allow the exit beam to pass through harmlessly into the lower exhaust chamber.
- Pin tips should be cleaned periodically to avoid accumulation of chemical resin residue which may transfer heat back into the sheet.
Engraving Resolution and Fume Evacuation
Achieving optical-grade surface engraving and spotless faces requires balancing beam line pitch, scan speed, and vacuum airflow:
- Scan Resolution (300–500 DPI): Keeps the line pitch within 0.050 mm to 0.085 mm range. The narrower line pitch concentrates too much heat that melts the resin, whereas wider line pitch leaves visible scan lines.
- Bi-Directional Speed (300–500 mm/s): Avoids the accumulation of heat near graphics boundaries and avoids perimeter edge burn.
- Exhaust Pressure (≥1,200 Pa): Downdraft static pressure ensures removal of volatiles as monomer vapor before condensation can occur on optical window surfaces.
- Multi-Material Fitment: When integrating clear display windows into full-plastic assemblies, consulting guidelines for laser cut plastic ensures consistent fit across various engineering plastics.
Offset your cuts in your computer and lift up the material by using pins in order to prevent bottom side heat reflections from damaging your material.
FAQs
Can you laser cut acrylic?
Yes, acrylic (polymethyl methacrylate, PMMA) is considered to be the most laser-friendly thermoplastic material. The 10.6 μm wavelength CO₂ laser beam interacts very well with PMMA, allowing for clean cutting through the dissociation of the molecular chain links of the polymer without carbonization. In contrast to PVC, the laser cutting of acrylic does not produce any corrosive gases, such as chlorine gas.
How thick can you laser cut acrylic?
High-power CO₂ laser machines can perform single-pass cuts on acrylic sheets up to 25 mm (1") thick with satisfactory edge verticality. Industrial machines handle sheet thickness ranging from 3 mm to 10 mm easily. Machines with greater power capabilities (150 W to 300 W) can cut sheets up to 30 mm thick, but taper angles exceed 2° and optical transparency at the bottom edge decreases considerably.
Why does laser cut acrylic turn white (frosty)?
The frosted appearance of laser cut acrylic results from micro void scattering resulting from rapid cooling or poor quality of the materials used. The air assist pressure used is too high and cools down the hot edge fast before self-leveling that would form an optical polish is achieved. Secondly, using too much heat while cutting extruded acrylic creates re-solidified bubbles. This can be avoided through low pressure at 0.2 to 0.5 bar.
Cast or extruded acrylic for laser engraving?
Yes, cast acrylic is the ideal material for laser engraving. When laser engraved, cast acrylic does not melt, but instead sublimates from solid to gas, producing a deep bright white, and contrasted mark. Laser engraving of extruded acrylic will melt, leaving a shallow uneven transparent mark that has almost no contrast and calls for paint filling after etching.
What safety precautions are required when laser cutting acrylic?
Laser cutting PMMA generates volatile methyl methacrylate vapors, which present respiratory and fire risks. Operators should maintain exhaust air velocity above 15 m/s at the manifold and fit machines with immediate flame-detection sensors. Acrylic cutting should never be left unattended. Protective optical enclosures must comply with ANSI Z136 or EN 207 standards for 10,600 nm infrared radiation, and fire extinguishers should be kept within easy reach.
Conclusion
Clean acrylic cutting is a balance of resin chemistry, optics, and the right assist gas pressure. Reduce your cutting air assist to 0. 2– 0. 5bar, select the right focal distance and eliminate internal stress with an 80°C annealing cycle and you can always produce clear parts that won't craze under solvent.
When component requirements surpass what thermal beam processing can achieve, alternative fabrication methods offer proven engineering solutions. If your design involves tight press-fit interfaces or complex sheet layouts, reference standardized laser cutting kerf and tolerance standards to calculate exact offset allowances. For extra-thick plastic stock (>25 mm) where heat-affected zones or vertical edge taper cannot be tolerated, review laser cutting vs waterjet compared to evaluate cold-abrasive cutting as a zero-thermal alternative.
Engineering & Quality Notice: Baseline values, roughness metrics (Ra), and thermal tolerances in this guide reflect standardized testing under controlled shop-floor conditions. Final dimensional conformance depends on thermal ambient control, sheet stock quality, and design-specific geometry.

Resource